


 Art & Design
 Auto & Vehicles
 Beauty
 Business
 Education
 Entertainment
 Finance
 Food & Drink
 Health & Fitness
 House & Home
 Libraries & Demo
 Lifestyle
 Maps & Navigation
 Medical
 Music & Audio
 Parenting
 Personalization
 Photography
 Productivity
 Shopping
 Social
 Sports
 Tools
Tools Travel & Local
 Video Players
 Weather
 Family


 iReplica
OS :
Version :4.0
Size :1.11Mb
Updated :Nov 15,2022
Developer :Jose-Manuel Alonso
 Ask AI
You can ask
the AI some questions about the app
Here are three potential topics that users may discuss about the IReplica app, turned into questions for you:
1. What features do you think are most useful in IReplica for creating realistic replicas of objects?
2. How do you plan to use IReplica, and what kind of objects do you hope to create with the app?
3. Are you concerned about the potential limitations or drawbacks of using IReplica, and how do you plan to work around them?
 Ask AI
Pros and Cons from users' feedback
I'd be happy to help you with that! After analyzing the user reviews on the Apple App Store, here are three pros and three cons of the iReplica app:
Pros:
1. "Easy to use and navigate, great for creating digital replicas of important documents."
2. "High-quality scans and OCR capabilities make it a reliable tool for document management."
3. "User-friendly interface and seamless integration with other apps make it a convenient option."
Cons:
1. "Occasional glitches and crashes can be frustrating, especially when working on important documents."
2. "Limited editing capabilities can be restrictive for users who need to make frequent changes."
3. "Some users report issues with document recognition and accuracy, especially with complex documents."
Please note that these are general summaries based on the user reviews and may not
App
Downloads
<
>


App
Survey
-
Do you think the payment of application features affects the experience?
-
Ease of use of the application Does it affect the experience?
-
The degree of memory and power consumption Does it affect the experience?
-
Whether the application ad recommendation affects the experience?
Description
If you've ever wanted to capture a photo that closely resembles what your eyes see, the iReplica is just the app for you. iReplica provides users with the ability to both capture and save pictures in RAW, while also providing two different processing pipelines to adjust the image. iReplica is currently in its initial stages, and we are regularly improving its mechanics. The camera application is inspired by work from the laboratory of Dr. Alonso. The app is written by Adam Khoukhi, who is supervised by Hamed Nasrabadi, both are in the laboratory of Dr. Alonso. The purpose of developing this application is to provide vision research in order to better understand how the human eye works. So you will be able to closely replicate what your eyes see on your phone and contribute to world-class vision research!
The Capture Photos stage is, simply, where you will capture the photo. iReplica captures photos in RAW. Under the viewfinder display is the capture adjustment segment selector. By simply clicking, or swiping to the selected segment, the user can adjust the exposure of the photo before it is captured through the slider. The left segment, the shutter speed, is to be used to adjust the exposure of the image. You may also tap on the viewfinder for auto exposure & autofocus based on the coordinates you tapped on. The sun symbol to the right helps us internally; depending on the ambient light in your environment, we can adjust the stops when implementing HDR. Select the pair that best fits your environment (i.e. Day & Outdoor). Whenever the user adjusts the Shutter speed, the exposure mode is set to manual. The minimum and maximum are device-dependent. The ISO is by default set to the minimum in order to reduce noise.
Once you capture a photo, the application will also capture 2 more images: one with a lower exposure and one with a higher exposure. The application then starts processing the RAW sensor data. Since the photo is captured in RAW, we must first read and process the unprocessed sensor data in order to display an image. If you would like the RAW data, no worries, you can save the RAW photo alone or with the processed image. Processing the RAW sensor data does take some time and is done under the hood. While the screen has a loading page, the application first reads the unprocessed sensor data. It then applies a black level so the image doesn’t look saturated, and applies a white balance so that white looks white and not green or yellow. Once the color is correct, the application demosaics the Bayer pattern and applies the appropriate color space conversion. Lastly, HDR is implemented.
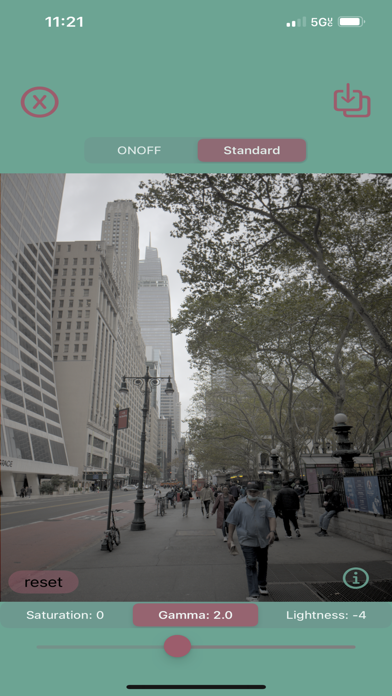
The first method, standard, applies what is commonly applied, a gamma correction. In this method, you can process the image by adjusting its gamma correction, contrast, and brightness. A gamma correction in the range of 2.2 to 2.6 usually produces the best results. We are improving the effects of the adjustments so stay tuned for better-looking results. The other method, ONOFF, is our custom method that involves adjusting a weight, alpha value, an off beta value, an on beta value, and a saturation percentile. This method is closely related to what our eyes see, and was based on the biological functions of sight.
Once you're done editing, you can save the photo to your Photos by clicking the save button on the top right corner. There, you will have 3 saving choices; click on the RAW if you would like to only save the captured photo in RAW. This will save a DNG file, about 12 MB in size, in your Photos. The preview that you see for the RAW is simply a jpg preview. Click on Processed if you would like only to save your processing of the captured photo. This will save a png file that looks identical to the image displayed on your screen. If you would like to save both, then click on RAW+Processed (Note: this will save two separate files).
{{descriptionMoreText}}
Comments (0)
{{commentText.length}}/{{maxCommentText}}
{{commentError}}{{commentUserError}}
-
{{comment.commentUser.substring(0, 1)}}By {{comment.commentUser}}{{comment.commentDateString}}
Category Top
apps
- Google Play
- App Store


More Apps